Fritz Pölking
A simple motif..
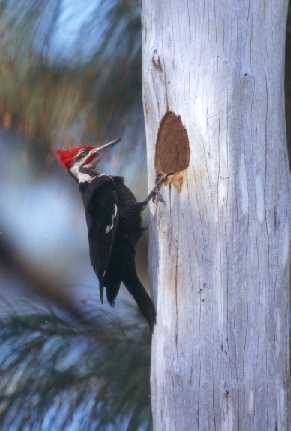
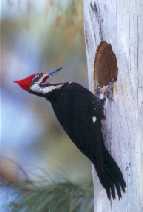
The Pileated woodpecker had his offspring toward the middle of April 2000 in a hollow about 8 meters off the ground in an Australian pine tree. This pine was located almost directly next to a road on the island of Sanibel in south western Florida. Therefore I was only able to take pictures from the other side of the road , where the telemeter of the lens indicated an exact 20 meter distance.
The parent birds were not at all shy, the light was consistently good – the light is usually always good in Florida – and actually there were no problems at all. The parent birds fed their young about once or twice an hour and let themselves be photographed rather easily.
However, the woodpeckers had a problem: somewhere close by, a red-shouldered-hawk must have had his roost and he did not like the presence of the black woodpeckers at all. Several times a day he would chase them persistently through the woods and was often only one meter in the air behind the woodpecker, until the woodpecker would hook a turn through the trees, or drop down a few meters in the air in order to get away from the bird of prey. I was very worried that the fast and deft hawk would catch one of the parent birds after all. There was also a hollow with a Red-bellied woodpecker in this tree but the hawk did not bother them at all.
The Pileated is the only black woodpecker in North America today, after the Ivory-billed Woodpecker – of which the last specimen was seen around 1969 – was considered to be extinct. If you compare the Pileated woodpecker with our European black woodpecker, it is not difficult to see that they had the same ancestors. Perhaps they were one species during the days when the continents of America and Europe were still connected through a land passage and that this species split and developed into two separate subtypes after the two continents drifted apart and an exchange was not able to take place any more.
Nikon
F5, 4.0/600 mm with a 1,4x converter,
SB-24 flash with a teleflash FX-1 and
Nikon consecutive-flash-time-reducer SB-6
On the Burzynski flash mount,
Burzynski vertical format angle,
2 tripods, Fujichrome Provia
My camera location here with the American black woodpecker was – in reference to the distance – dictated by the street. I was only able to determine the angle to the hollow from the side. While doing so, I chose a location from which the typical horseshoe form of the black woodpeckers hollow could be seen. Farther off to the side, I would have been able to catch the woodpecker clearer in front of the background, but the hollow would not have been very outstanding.
Then I tried finding the best focal length: 600mm was a bit short and showed too much of the surroundings. With the double converter and 1.200 mm focal length the woodpecker filled out the format of the picture, which I was not satisfied with either since there was nothing else to be seen besides the woodpecker and made the picture boring. That type of picture would be perfect if taken for a field guide, where the emphasis is on showing the animal rather large and in detail and there is no need for an aesthetically and convincing impression of the whole.
In the end I chose 840 mm as the focal length, meaning 600mm with a 1.4x converter. The woodpecker was large enough and the surroundings and background still visible enough to balance the picture. It certainly would have turned out the same using 700 mm, meaning 500mm with a 1.4x converter.
Location and focal length were determined, but what about the light management? Here the sun was pretty steep all day and there was no instance when the light created the opportunity for a pretty speck of light in the eye. So I clipped the Electron flash onto the camera, set the flash angle at 85 mm, the strength at –1.7 shades of underexposure and placed the FX-1 teleflash in front of the electron flash in order to have the angle of the 300mm lens lit up and the range of the flash was lengthened by about 2 f-stops. Then I set the flash timer for the second shutter drape so that the "highlighter for the speck of light in eye" would not affect the actual exposure time.
If you use a flash in wildlife photography, you automatically have a problem with eyes that glow fiery red. These red eyes do not always appear, it depends on the animal species, the time of day and of the light situation while photographing. They appear easily with owls, cats and herons. With other species maybe or maybe not. You can never tell. That is why "better be safe than sorry" is the best motto while photographing with a flash. If there is enough time, you can always follow it. In this case I had all the time in the world. There is a simple solution for avoiding red eyes. Place the flash as far away from the camera as possible. Wildlife Photo Accessory Supplier Burzynski has a fastener for flashes that need to be far enough away from the optical lens during long focal length settings and that is exactly what I am using in this situation just to be on the safe side.
One should always fade out a telephoto lens at least one step if that is at all possible. There is no telephoto lens that can reach its best optical performance with an open aperture. This is especially the case while using a converter. Besides that, this one point in aperture brings a bit more sharpness of depth and in turn, more comfortable working conditions. That is the reason why I set the lens at an aperture of 5,6, which – through the converter – achieved a working lens of 8,0. Since the trunk of the tree was half or totally in the shadow most of the time, I had an exposure time of mostly 1/60 or 1/100 sec. A minor problem: 1/60th is at 840 mm focal length even on a sturdy tripod not easily controlled, especially not if in the few seconds available while the woodpecker is in front of his hollow and just before he disappears in it, you want to take numerous pictures with the motor drive. The short consecutive shutter clicks of the camera are cause for an increase in shock waves which are not very conducive for the sharpness of the picture. In this situation a picture stabiliser in the lens would be of great advantage.
I took a second tripod with me, since unfortunately there is no such picture stabiliser available for my 600, in order to additionally stabilise my lens/camera unit from behind. This is actually very easy while shooting horizontal pictures, but a bit more difficult with vertical views. Where can you fasten the tripod to the camera? In this case, a great help is the Burzynski vertical format angle. If you fasten this to your camera, while shooting vertical pictures, you can attach a tripod under it and you do not have to try to attach it on the side of the camera. This solution causes the camera and lens to have a solid two-point support and practically eliminates all shock waves that could disrupt the picture sharpness.
The next problem was the right exposure: It would not have been advisable to use an automatic exposure setting, since the exposure time was altered a whole point when the woodpecker appeared in the picture. Which is explainable: the same way a white polar bear lowers the exposure time by one point, the dark woodpecker turns the exposure time up by one point, thus the picture turns out too bright. So, change the setting of your exposure selection to M (manual), but which one? To focus on the woodpecker would make the picture turn out too bright, but to focus on the trunk of the tree could turn the picture too dark, since it appeared to me as being a bit darker than a medium grey. To use a hand meter or grey card was not possible in this situation. So I estimated the tree as being 1/3 brighter as the medium grey and set the exposure at 1/3 overexposure. Now since it is rather difficult to calculate the image of a black woodpecker at a –1.7 underexposed background flash on a very light coloured tree trunk and since the best compromise was actually a rather moderate light setting, I additionally set the bracketing function at +0.3, +/-0.0 and –0.3 apertures. This way I would always get three pictures in sequence: one with the correct (according to my estimation) exposure and one each at a third aperture above and below. So if my estimate was not completely off, I still had a chance to get a picture with an almost perfect exposure, if the deviation was not greater than the give or take 1/3 point of aperture.
I am sorry to say, that with these types of subjects – in order to heighten the sharpness of the picture – you can not use the advance shutter release, which is not only very helpful on close-ups with macro lenses, but with telephotos as well if you use exposure times of under 1/125 sec. – especially while shooting vertical pictures. The effect is especially a lot worse since the shutter opens sideways and not from top to bottom during vertical shots. In any case, the available solutions for advance shutter releases are not necessarily optimal nowadays: Nikon only offers it with the F5 and then only by manually activating the shutter by pressing it up. Another draw-back is that you can only use the advance shutter release in combination with the manually activated exposure setting, meaning that with changing light you have to readjust continually. With Canon you have the great advantage, that all the EOS reflex cameras (even the most inexpensive ones) come with a advance shutter release (whereas Nikon is of the opinion that you deserve one only when paying at least DM 5,000 for an F5), but you do have to release the shutter in advance every time before taking each picture.
Unfortunately you cannot use either one on such motifs as seen here. When the woodpecker arrives, you usually have only seconds to get the right pose of the head and you can´t manually set the shutter on the F5 or activate the release twice for every picture with the EOS system.
Since most modern cameras today have 20-30 individual settings, it would be ideal to manipulate the advance shutter release through two functions: either the way that Canon has available presently by activating the shutter release twice (first to set the shutter, second to expose the picture) or to add an additional feature, with which you set the shutter in advance through the first release and then you can take as many pictures as you like, after which the shutter would return to its normal position, perhaps through turning the camera off.
Why does the photo industry never consult the photographers as to what they need? At the PMA in the U.S., Nikon for instance asked the photo merchants what type of lens they should equip stabiliser with.... Good grief !!!!..... asking the merchants...!!! As if they knew what a photographer needs. A merchant only knows the annual bonus he gets from whatever company and that it is not enough. Why not ask the photographers? I have never been asked by any company what wildlife photographers would want or need from the photo industry. They probably don´t ask anyone at all (aside from the merchants that is). Perhaps that is the explanation for the mostly incomprehensive decisions made by Nikon and Canon.
Another assistance I used for this picture was the time reducer for flash series Nikon SK-6. With this you can reduce the interval between each flash by half. If, without it, you have to wait 2 sec. for the flash to recharge, with the SK-6 you only have to wait 1 sec., which is great. Modern technology is a bit contradictive: here we have cameras that can take 4, 6, 8, even 10 pictures a second, but the flash needs 6 seconds to recharge.
Well, so here I had three flash accelerators employed: first the telephoto clip which reduced the flash power by two apertures, then secondly, the underexposure of 1.7 apertures through the corresponding setting of the flash, since I was´nt using it as a real flash but only as a brightener in order to have the speck of light in the woodpecker´s eye, and third this Nikon SK-6. All three together enabled me to take pictures without pause for recharging the flash, which was very pleasant indeed.
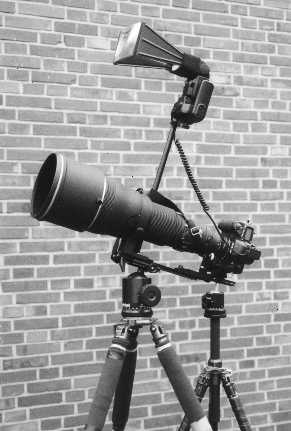
Here
a picture of the "tools of the trade" used in order to
get an idea
F5, 4.0/600mm, 1,4X converter, the camera is equipped with the
Burzynski
vertical lens fastened on the second tripod. The Burzynski track
under the lens
has two functions: the entire unit lens/camera does not teeter
any more, but has a second support at the end of the lens, and
seond: you can adjust it on the changeable plate and this way
keep the entire unit continually balanced out no matter if you
use a heavy or light weight camera, with or without converter or
with a 1,4x or a 2x converter, since the point of balance is
different with each combination.
Whoever is interested in the
technical assistance can get information
material for the flash clip, the vertical angle and the camera
track through
"Naturfotografie Spezial-Zubehör Rainer Burzynski"
and for the telephoto flash clip through ISAR-Foto Bothe.
Addresses available under "Links".
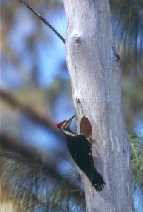
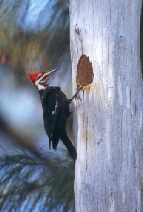
Here the same motif taken with 600mm, 840 mm and with 1.200mm.
********